I've just returned from Tokyo where I did demo for Tsukineko Japan.
It's huge show, all three days packed by visitors more than 100,000.
I'm awaiting Amtrak for SanDiego right now surrounded by Subway, Starbucks and Wintzels with yummy smells!
Which should I have? :)
Monday, April 29, 2013
Saturday, April 27, 2013
AIR - Canvas Coaster
It is fabric project but no sewing involved. Easy and inexpensive, fun and usable.
 |
| Finished coaster |
 |
| Cut natural canvas fabric 4"x 4", remove about 10 strand from edges. |
 |
| Wish washi tape, mask edges |
 |
| Color background with VersaCraft inks. First color is KIWI |
 |
| Add Pale Aqua |
 |
| Add Celadon |
 |
| Stamp Flower (Penny Black) With VersaCraft Cool Gray - hard to see on the screen - sorry! Pale color is used on purpose!! |
 |
| Color in flower patals with All Purpose Ink Tangerine. Fantastix is great for painting fabric with API. |
 |
| Patals are done |
 |
| Trace outlline with Fabrico Marker - Black |
 |
| and Vines and Leaves with Fabrico Marker Forest |
 |
| Add All Purpose Ink - Platinum to flower center. |
 |
| DTP VersaCraft - White to soften the image. |
 |
| Define petal center again. |
When all inks are dried, heat set with iron.
Since I made a tote bag from canvas fabric last month, I have good amount of remnants with me. I should use them, LOL.
All Purpose Ink, Fabrico Markers, VersaCrafts are great fabric (and other) ink. Heat set make it permanent.
It's great kids projects too. You can stamp, draw, doodle, or just colors, make a little gift, or, make it rectangle shape for tags.
Hope you enjoy!
Wednesday, April 17, 2013
AIR - [SPRING]ss
Another assignment for April is [SPRING}.
For this project, I decided to use Goosebumps (texture spray) and Fireworks mist in spring color.
 |
| Apply Goosebumps (dauber cap bottle) to my stamp (Penny Black) directly |
 |
| Goosebumps is beading up, but that's OK. Stamp on white cardstock, let it dry (say about a few menutes) |
 |
| Spray Fireworks - Angel Pink |
 |
| Keep on spray Fireworks - Summer Sky and Lulue Lavender |
 |
| Spray same 3 colors of Fireoworks to the stamp randomly. |
 |
| Put the cardstock on the stamp (because the stamp is too wet) transfer image. |
 |
| Let it dry |
 |
| On separate white card stock, stamp MIMI (Penny Black) with Memento Tuxedo Black. |
 |
| Color with copics. I used R00/E02/R02 for skin, R32/BV31/B63 for wings and clothes, E50/E21 for hair |
 |
| Cut out |
 |
| Finished card (5 1/2 x 5 1/2) Assemble card base, panel and background panel, then adhere MIMI with pop dots, adhere lace trim. |
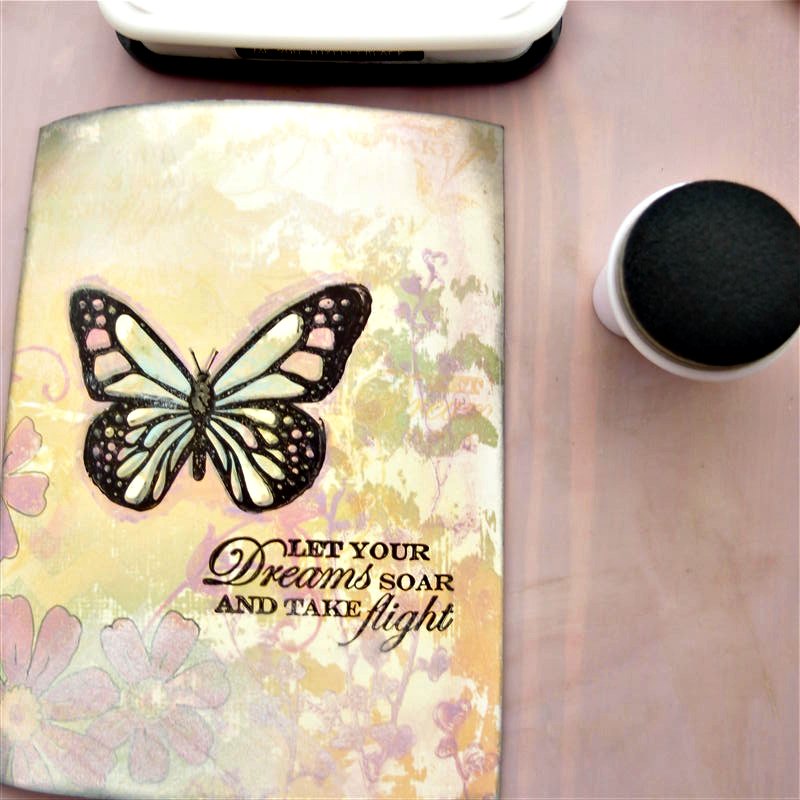
Sunday, April 7, 2013
AIR - VersaMagic in spring colors
Mixed Media style is getting popular, and I love it too.
This month, our assignment ink is VersaMagic Dew Drops.
Our John picked lovely spring-ish color combinations for us, and I was curious how they can be Mixed Media style?
Here's what I played.
 |
| 3 background colors Aloe Vera/Mango Madness/Thachet Straw |
 |
| On Coated paper, DTP 3 colors ramdomly |

 |
| Ink up background stamp (Hero Arts) with 3 background colors |
 |
| stamp over the background |
 |
| While ink is still wet, wipe some part with paper towel to scrap off some color |
 |
| if your ink pad get muddy, wipe off on paper towel gently |
 |
| Stamp Ferns (Penny Black) with Spring Pansy |
 |
| Stamp Butterfly (Penny Black) with Memento Tuxedo Black |
 |
| Using Brushstix, color butterfly wings with VersaMagic. Don't worry about outline at this stage. |
 |
| Scrape off some color with dried Brushstix |
 |
| Over stamp the butterfly with Brilliance Graphite Black |
 |
| to make outline standout |
 |
| Sorry, I forgot to take picture this stage, I again stamp background flower vine (Penny Black ) with Spring Pansy. Then, with Memento Marker, outline the part of background flower |
 |
| After stamp the sentiment with Brilliance Graphite Black, DTP Brilliance Sunlight White lightly to background area to make it misty. Isn't it lovely? |
 |
| Add edge shadow with Memento Tuxedo Black. I love Jumbo Dauber to make edging. After all thing dried, I applied thin coat of Creative Medium for finishing touch. |
 |
| Finished card. Applied lace trim and pearls (Hero Arts) at the bottom. TIPS VersaMagic is chalk finished ink. It is water based pigment ink yet dries on glossy paper. As you may know, pigments on the glossy paper could come off when it scratched. This character makes such a layerd and faded effects. In the other hand, it could be damaged later, that's why I used Creative Medium for protector. Another tip with this project. On glossy paper, dye ink (Memento pad and marker) is soaking into the paper, but pigments will stay on surface. The reason why I used Memento to stamp the butterfly first time, is make it faded as rough draft. Brilliance is another opaque pigment ink and dries on the glossy paper, so it was used as finishing ink. If you like more distressed look, you can use sanding paper to scrape colors. it will shave off more ink.
Hope you enjoy this project.
Until next time :)
|
AIR April Monthly Challenge
Hi all


For keep your Tack N Peel good and clean, put back protector film on. Since the film is clear, easy to lose, I put some marking on the film - and this one, using masking/washi tape.
Also there's right/wrong side on the film, and on wrong side, it stick too tight. So, I recommend mark your film at first time.
Few more thing from my experience.
Caring is easy. Wash with water and air dry. That's it.
I do keep even small pieces for use in many way. Put a small piece between the lid and liner of Briiliance/StazOn/VersaMagic lid. Put a small piece on my finger or stick for small stamp. Put a little item on my desk wall, keep my nestabilities together. So, just keep it, you'll find more use.
I hope you enjoy Tack N Peel.
The first project for this month is TACK N' PEEL.
If you haven't seen it, there's youtube video from Imagine Crafts/Tsukineko.
Actually, I was contributed to develop this products about a decade ago.
That time, unmounted rubber (just a rubber stamp sheet with no cushion nor wood mount) started from small rubber stamp company, I've been looking for an easy and long lasting adhesive thing for acrylic block. To me, TACK N" PEEL is the answer because
- can be used again and again
- clear (getting cloudy in time though - still can see through)
- hold stamp or other materials tightly
- cushion effect
- easy maintenance (just rinse with water)
- inexpensive - stick to your acrylic block, not to stamp
- Fun Foam stamp die cut or your own


- Hold small items on working table no more missing beads nor eyelets! Also good for holding your tools or pens from rolling out.


- Ink Pad Handle - keep your fingers clean and easier handling for DTP/inking

- Holder for thin material - great for edging chipboard, domino, buttons, you name it

HOW TO PREPARE

 |
| 1. Trace your acrylic block on yellow side |
 |
| 2. Cut |
 |
| 3. Remove Yellow Backing Sheet |
 |
| 4. Adhere to acrylic block |
 |
| When you use, remove protector film |
 |
| Attach UM rubber stamps * |
Not only UM rubber stamps, but also old cling stamps or clear stamps which are no longer stick.
If you have problem with those, Tack N Peel is the solution. (Be careful, removing new and still-sticking-good cling or clear stamps on Tack N Peel will be hard. So if you have happy cling/clear, use un Tack N Peel side of block) Rubber falling off from your wood mounted stamps, can be used with Tack N' Peel. If your old wood mounted stamps have problem with cushion (it happens often to me) put it in microwave for seconds for losing adhesive, then peel rubber. Your stamp will be brought back. Rubber it'self are lasting very very long.

Also there's right/wrong side on the film, and on wrong side, it stick too tight. So, I recommend mark your film at first time.
Few more thing from my experience.
- Avoid sticking to the paper. It will stick, and paper fiber won't be removed. If it happens, soak in water and scrape off paper residue.
- Also avoid powder materials like glitter, embossing powder, chalk, etc. They are not easy to remove.
- If it's too sticky, usually happens first few times, tap on your jeans. Fabric fibers will adjust adhesive force。
Caring is easy. Wash with water and air dry. That's it.
I do keep even small pieces for use in many way. Put a small piece between the lid and liner of Briiliance/StazOn/VersaMagic lid. Put a small piece on my finger or stick for small stamp. Put a little item on my desk wall, keep my nestabilities together. So, just keep it, you'll find more use.
I hope you enjoy Tack N Peel.
Subscribe to:
Posts (Atom)